The Spirit Within Tarot by Steven Bright and published by Schiffer Publishing blends tarot with shadow gazing to produce a powerful cartomantic tool that reads into your inner sanctum. I love the modernity of this deck, the color symbolism that comes out strong, and the aesthetic value of the contrast.
The card trim size is not a typical or standard tarot size and feels more oracle to me. Every aspect of this deck’s presentation feels fresh, modern, and outfitted to attract popular appeal.
Steven Bright of Tiferet Tarot has been a fixture in the tarot community who I’ve always looked to for his deck reviews and his social media posts, Tarot Thoughts. I love that this deck, which has been many years in the making, has come to fruition and not only that, has exceeded all expectations. It’s unique, it’s innovative, and you can tell it was designed by an experienced master tarot reader.
I learned a very important lesson from this deck: don’t knock it ’til you’ve tried it. The Modern Spellcaster’s Tarot was part of the free swag I got from Readers Studio 2018. When I first saw a few samples of the card images and read the back of the box, I shrugged and said to myself, “meh, not for me, pass.”
Wrong. I realized how wrong I was as soon as I unwrapped the deck and sifted through the cards.
Modern Spellcasters is that acquaintance you didn’t get a good first impression from because you’re an asshole set in your ways but then you actually take the time to have a couple of heart to heart chats and suddenly you realize holy crap, this is a kindred spirit and an amazing one at that.
Originally offered at the Tarot Readers Academy in 2018 for the Tarot Summer School
This course is structured after a graduate-level seminar with a series of lectures plus guided tarot readings ritualized and crafted to show rather than tell you about tarot in witchcraft. We’ll mimic an oral tradition where you listen to me talk about the who, the what, and the why, alongside my perspectives on the how. You may want to take notes throughout the course, for both the lecture and training modules, so that beyond this course, you’ll have a consolidated reference file on occult tarot.
The lecture portion covers a comparative analysis of exoteric, psychology-based tarot reading vs. an esoteric, psychic-based tarot reading, and also tarot as a witch’s tool. We’ll cover the history and legacy of tarot in Western occultism, focusing in on applying Hermetic principles to the tarot. Then we’ll consider the role of tarot and witchcraft in the modern era. Various techniques and approaches to using tarot as an occult tool will be covered. For novices who have yet to establish a personal systemized set of metaphysical correspondences, a packet of astrological, elemental, Hermetic, theosophical, Qabalistic, and Golden Dawn reference charts will be provided.
The practicum portion will be a series of guided tarot readings and training videos to demonstrate the basics and preliminary exploration of using tarot to commune with your Holy Guardian Angel, spell-craft for financial gains, extracting cards for talismans, petitioning forth spirit entities to conduct a divinatory reading, using tarot to commune with land spirits or assess the characteristic properties of a land, and tarot in pathworking, with proprietary training models shared on how to enhance your clairvoyance and clairaudience during a tarot reading.
Run time of all videos in this course is about 160 minutes, brought to you in digestible 5 to 15 minute segments, 16 videos in total.
Course Outline:
Module 1: Introduction; Differentiating Exoteric from Esoteric (14:46)
Module 2: Psychology-Based Tarot Reading vs. Tarot in Witchcraft
Section 2C. Mechanics of Esoteric Tarot (Further Discussion) (10:32)
Section 2D. Magical Modification (9:58)
Section 2E. Spell-Crafting with the Tarot (5:25)
Section 2F. The Anointing Blend and Module Conclusion (14:15)
Module 3: History and Legacy of Tarot in Western Occultism (9:34)
Module 4: Applying Occult Principles to Tarot
Section 4A. Hermeticism in Tarot (13:34)
Section 4B. Hermetic Life Path Reading (7:22)
Module 5: Occult Influences into Modernity
Section 5A. Tarot Defined as Witchcraft (10:26)
Section 5B. Guided Spirit Petition (7:18)
Section 5C. Witchcraft and Tarot in Modernity (11:54)
Section 5D. Communing with Land Spirits and Pathworking (15:38)
Section 5E. Guided Pathwork Through the Ace of Coins (13:47)
Section 5F. The Practicum Series in Review (8:58)
Section 5G. The Lectures in Review and Closing Remarks (6:00)
Accommodation for the Deaf/HH: Manual input of Closed Captioning provided for Modules I, 3, 4, and 5. Unfortunately, there is no closed captioning for Module 2 videos.
About Your Instructor:
The dedicated path of the witch, to me, is a calling. One is born inclined toward that path, but nevertheless, one must make that conscious and intentional choice to walk it. Fundamentally the path is a solitary and a marginalized one, forged from a singular personal gnosis that will run dangerously in contradiction to establishment. There will never be a time, past, present, or future, when the witch is not marginalized. Even when the accoutrements of witchcraft become fashionable, the true witch will still be shunned. That state is genetic to the path of a witch, and yet the margins are where a witch sources power. From the margins, a witch pushes boundaries or casts them. From the margins, a witch possesses the clearest view of the center.
I’m the author of Holistic Tarot: An Integrative Approach to Using Tarot for Personal Growth(North Atlantic Books, 2015) and The Tao of Craft: Fu Talismans and Casting Sigils in the Eastern Esoteric Tradition (North Atlantic Books, 2016). Over the years, I’ve presented on various metaphysical and occult topics at the San Francisco Bay Area Tarot Symposium, Bay Area Theosophical Society, Northwest Tarot Symposium, Stanford University, UC Berkeley, PantheaCon, and have headlined at Readers Studio in New York and the UK Tarot Conference in London.
Occultism and witchcraft are subjects of academic interest to me. I dedicate much of my life’s work to researching, personal and professional study of, and teaching esoterica. Yet ironically, it is my firm belief that the actual physical and physiological path of esoterica cannot be taught. A diligent teacher can lead you to the door, give you all the tools and train you in all the skills you’ll need once you cross that threshold, but no one can impart to you the experiential knowledge of what awaits beyond that proverbial door.
I share more about my own background in the esoteric here:
Watch a sample instructional video from the course to preview its contents:
How To Order
$25
I’m going to give step by step instructions on how to order the course and get access to download all the materials for yourself.
Send the tuition cost noted above via PayPal to the e-mail address abelldelivers@gmail.com. Yes, it’s going to say “James Zhang from Castro Valley.” That’s the Hubby. Also, this is the preferred method of payment. (~or~)
Only if (1) and (2) are impracticable for you, pay by ordering me an Amazon Gift Card, sent to abelldelivers@gmail.com. Direct link to Amazon gift card orders here.
When you send payment, please include:
Your name or a name identifier for me to reference you by, (~and~)
Your e-mail address, so I know where to send your ordered course materials to.
That’s it!
But if any of that sounds confusing or you just don’t know, no worries. Email me at abelldelivers@gmail.com to let me know you want to place an order. We’ll take it from there together.
Once I receive your payment as the purchase order, your course materials will be delivered to the e-mail address you specified within 2 business days.
If you don’t receive the course materials in the e-mail inbox specified within the two business days, then something went wrong. Doh! Please email me at the below address asap.
abelldelivers@gmail.com
DELIVERY NOTE: So far I’ve been good about getting the course materials to you in less than 48 hours from when I receive the PayPal payment, so if that time has gone by and you haven’t received anything from me, first check your Spam folder. Second, check to see the e-mail address associated with your PayPal account. I may have sent it to that account if no e-mail was provided in the notes section of the transfer. If still nothing, then something went wrong somewhere, so contact me at the above e-mail addy ASAP so we can get things squared away.
This is another post from my Quick Tutorial series for YouTubers and those who are looking to create video content.
It’s worth reiterating: I am not an expert (by any stretch of the imagination) when it comes to video production, I don’t own or use any fancy equipment and tech, I have no background in video production or photography, and actually, I think that’s kind of the point. The point here is to show you that yeah, you can do it, and you can do a halfway decent job at creating video content as a total amateur.
Instead of trying to collect all the latest gadgets that the YouTubers with million+ subscribers are telling you to get, work with what you’ve got. I hope that’s what this Quick Tutorial series is about: maxing out the capabilities of what you’ve got.
This post in particular will consolidate some tips and tricks I’ve learned about YouTube video making at the amateur level.
Record Your Videos During the Magic Hour
In photography, there’s this thing called the golden hour, or the magic hour. Fortunately, there are two each day. The first is the hour after sunrise, and the second is the hour before sunset.
I’m lucky because that conforms to my work schedule. The first golden hour is just before I leave for work, so actually, my makeup is freshly done. Most days I make it home before the second golden hour, just before sunset, so as soon as I’m back from the office, I go straight to recording the video.
If you don’t have lighting equipment, then I would urge you to try your best at scheduling video recording time during one of the golden hours. Afternoon sunlight can be too harsh, and after sunset, it’s often too dark. Cameras tend not to like artificial lighting, so then your videos get that grainy quality.
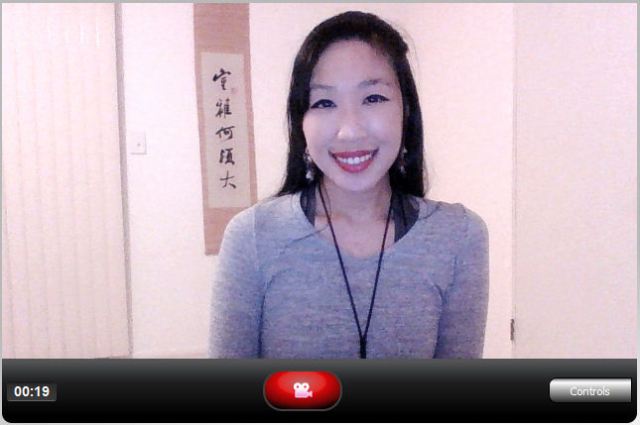
When you record during the golden hour, you can get away with a lesser-quality camera. I’m using a 1.3 megapixel webcam for both the video footage and the audio. For comparison, most professional YouTubers opt for a 50.6 megapixel resolution camera. These days, your smartphone camera is around 12 megapixels.
So yeah, given the drastic difference, the pixel quality of my current portfolio of YouTube videos is still shitty compared to what most people are shooting at these days, but it isn’t so offensive in quality as it could be (given the 1.3 megapixel resolution) because I’m shooting during the magic hour. Shooting at the magic hour compensates for that drastic resolution difference.
For me, I’ve also found that recording during the morning magic hour by an east-facing window is the best, and recording during the evening magic hour by a west-facing window is best.
Guys, if you can, follow the magic hour in photography. It truly is magical. You get that soft diffused light on your face and that perfect balance of light and shadow in the frame. You know those expensive ring lights that makeup and beauty gurus get? Yeah, the whole point of those things is to recreate the lighting of the Magic Hour. You get two for free each day, so if you don’t want to invest in a ring light, then try to schedule your recording time to the Magic Hours.
Basically, this Quick Tutorial series for newbie YouTubers like me demonstrates how to make video content on a shoestring budget, or no budget at all. The premise is to be as low-tech as possible, using what you probably have on hand already. It’s all about being smarter with what you have.
Before reading further, can we both acknowledge that I am not an expert, not sufficiently experienced or skilled to the level where I should be giving anybody advice, and have literally only been doing this for about a year. On the other hand, to make a case for myself, I think this makes the Quick Tutorial series all the more endearing. It’s me saying to you, hey look, I don’t know what the heck I’m doing but I still manage to get stuff up and running, so you can, too.
Note: MovieMaker was discontinued effective 2017 and replaced with something called Windows Story Remix. Since my computer and my set video-making ways pre-date 2017, I’m going to proceed with MovieMaker. Assuming at some point in the future I upgrade to Windows Story Remix, I’ll make a Quick Tutorial for that then.
The first thing I do is set up my laptop on a stack of books to get the angle and positioning just right. (I’ll get into how to angle and position your camera lens in the subsequent post.) The laptop came with a video camera recording program, so that’s what I use. I click the red record button, and then just go.
I like to use jump cuts (also explained in subsequent post) so that it’s easier for the final video product to look like I stay on point the whole time and don’t wander off on irrelevant tangents or have you all sit there watching me think, on camera, about what next thing I want to say.
Click to reserve your Season Pass! $199. Installments available.
This is my third year participating as a master class instructor at Tarot Summer School and the line-up is spectacular. You’re not going to want to miss this intense semester, so get the Season Pass!
You get lifetime access to any course you purchase. If there are 7 courses you’re interested in and you buy each separately, that’s almost the cost of the Season Pass. For $199, you’ll get all 13, and get access to the courses for life. So it’s not like you have to do all 13 courses this summer. Buy it this summer and save it for later. Revisit the courses as frequently as you like. It’s a pretty incredible deal when you think about it. Click on the banner above to book your Season Pass, or check out the courses separately below.
I’ve hyperlinked the titles to their respective course description page at the Tarot Readers Academy. There are also hyperlinks for each instructor’s own website or professional landing page. That way if there are any names you’re not familiar with, you can learn more about their work.
Yeah, yeah. This post comes really late. Everyone else with a blog or YouTube channel who is into astrology has already given their two-cents on this. So I wasn’t going to. But you guys keep pestering me about it. So I’ve been meaning to get to this, but blah. Okay, here you go. Uranus in Taurus. According to Bell.
Source: U.S. Information Agency
What happened the last time Uranus was in Taurus?
On May 15 of this year, Uranus entered Taurus during a new moon. To consider the implications, we start by looking to history to see if we might spot patterns. The last time Uranus was in Taurus, it was just after the Great Depression and into the start of World War II. In other words, it was approximately 1934 to 1942.
Nazi Germany came in to power during this time. It was a period of divisive social politics in many parts of the world. Invasions, smaller wars, and border conflicts were happening on multiple continents. Dramatic changes were taking place when it came to U.S. policies affecting the economy, such as the New Deal (to counter the effects of the Great Depression).
Over in the corner of modern witchcraft, Gerald Gardner was traveling through East Asia, and as that particular Uranus transit came to its close, Gardner was initiated into the New Forest coven. All this, to me at least, is an interesting synchronicity, because I talk about these points in the course I’m offering at Tarot Summer School 2018. In Module 5, “Witchcraft and Tarot in Modernity,” I cover these periods of modern history and the relevance to occult history.
Oh, and then the last last time before that when Uranus was in Taurus? Uranus entered Taurus on April 16, 1851 and stayed there until March 14, 1859. You had the Crimean War ravaging through Europe, the Opium War in China, along with the Taiping Rebellion. Over in the U.S., civil rights is in contention and several landmark events shape this period and the periods to come: Uncle Tom’s Cabin, the Dred Scott decision in the Supreme Court– once again, divisive social politics– and the Republican Party is founded in 1854 on anti-slavery and pro-immigration ideologies. (I just mention that because there are some interesting parallels going on in the U.S. at the moment, during our present day Uranus in Taurus.)
Then before that, May 1767 to April 1775. Oh. Shit. Guess what. That’s the American Revolution. So yeah. Uranus in Taurus, where the planet is in detriment*, is, in short, a time when we tend to. ahem, make history.
Pamela Colman Smith: The Untold Story is the most comprehensive, devotional, and poignant tribute to Pamela “Pixie” Colman Smith we’ll see this century. It’s a magnificent treatise and homage no tarot lover will want to miss. Co-authored by Stuart Kaplan, Mary K. Greer, Elizabeth Foley O’Connor, and Melinda Boyd Parsons, The Untold Story is the sum total of knowledge, research, data, and documents we have on the artist behind the Rider-Waite-Smith tarot deck and her works.
Perhaps its greatest accomplishment is how it has brought Pamela Colman Smith to life. You’ll get to know her life and works, her family, her art, her interests, her personal spirituality, her quirks, and her multifaceted personality. Her words, through letters and the articles and stories she penned, reveal an animated, unconventional, extraordinary woman.
The first quarter of the book, “Pamela’s Life,” is authored by Elizabeth Foley O’Connor, an academic researcher who is writing the literary biography of Pamela Colman Smith.
Corinne Pamela Colman Smith, who went by the nickname “Pixie,” defied so many social norms, it’s hard to keep count. The more you read about her, the more impressed you get.
Let’s not kid ourselves here: I am no expert at YouTubing and you’re probably better off learning video editing from someone else. But what I hope this Quick Tutorial series will demonstrate is how you can make halfway not-crappy videos with a lot of multi-media stuff going on and do it without spending a lot of money on tech.
I spent zero extra dollars on tech to make my YouTube videos. I use a webcam (which, come on, everybody has; my old-ass retired parents have one) for both the video and microphone functions, try to schedule my recording times to the sunlight (in other words, I don’t have special lighting equipment), and software programs that already come with my computer or can be downloaded for free off the Internet. And I do all of this from a $300 laptop I’ve had since 2014.
This tutorial post is specifically for YouTubers who’d like to add a more multi-media dimension to their videos by including animated PowerPoint slides with voiceover narration. Using PowerPoint is a budget-friendly way to vamp up your videos. Here’s how you do it.
First, open PowerPoint on your computer. It came free with my computer. So it’s not even like I needed to buy any fancy tech to make YouTube videos. The default first slide will look something like the below. I select the text boxes and delete them so I can begin with a blank slate.
To insert a photograph that will become the background image, start by going to the “Insert” tab at the top. Click on it, and then click the icon for “Pictures.” You can click on the screen shots in this post for enlarged viewing.
As an example, I’m inserting this photo I took of me holding the Page of Cups up to a painting. If your photograph is exactly the size of the Presentation slide, it’ll auto-fit. Otherwise, you may need to adjust manually.
These days, the default proportion is 16:9 so if you want a photograph to be the background image in the video, it should be at the proportion 16:9. (Most camera phones have an option where you can select this proportion to make sure the photos you’re taking are at that width x height ratio.) For YouTube videos, you want images to be a minimum of 1280 pixels by 720 pixels.
Now click on the tab “Animation” then the tab option “Animation Pane” to show the Animation Pane. You’ll see it appear in the screen shot below.
Now let’s say you want text to appear on the screen. You’re now in the “Insert” tab (see top row across your browser, the red row), then click the icon “Text Box.”